Introduction
Hello everyone 👋
In our continuous series of SCADE articles, today we will be developing a SCADE application that will demonstrate the gesture implementation for both Android/iOS platforms. This app will contain the use case of displaying the touch effect to buttons when pressed. It improves the user experience for the SCADE apps. The good part is, the same codebase is used for both Android & iOS platforms.
Swift + SCADE = Awesome App ✌
So let’s start 😎.
Prerequisite
If you haven’t installed the SCADE IDE, download the SCADE IDE and install it on your macOS system. The only prerequisite for SCADE is the Swift language (at least basics). Also, please ensure the Android emulator or physical device is running if you want to run SCADE apps on an android device.
Getting Started
To keep it simple, let’s understand the concepts by creating a new SCADE project, File -> New -> New Project. Then select the SCADE option, enter the project name, and click Create. We are ready to code the SCADE app.
We will now create the user interface of the application. Now navigate to the folder/sources/main.page and click on the + button on the top right of the editor and drag the widgets such as label, button, etc.
Create Some UI
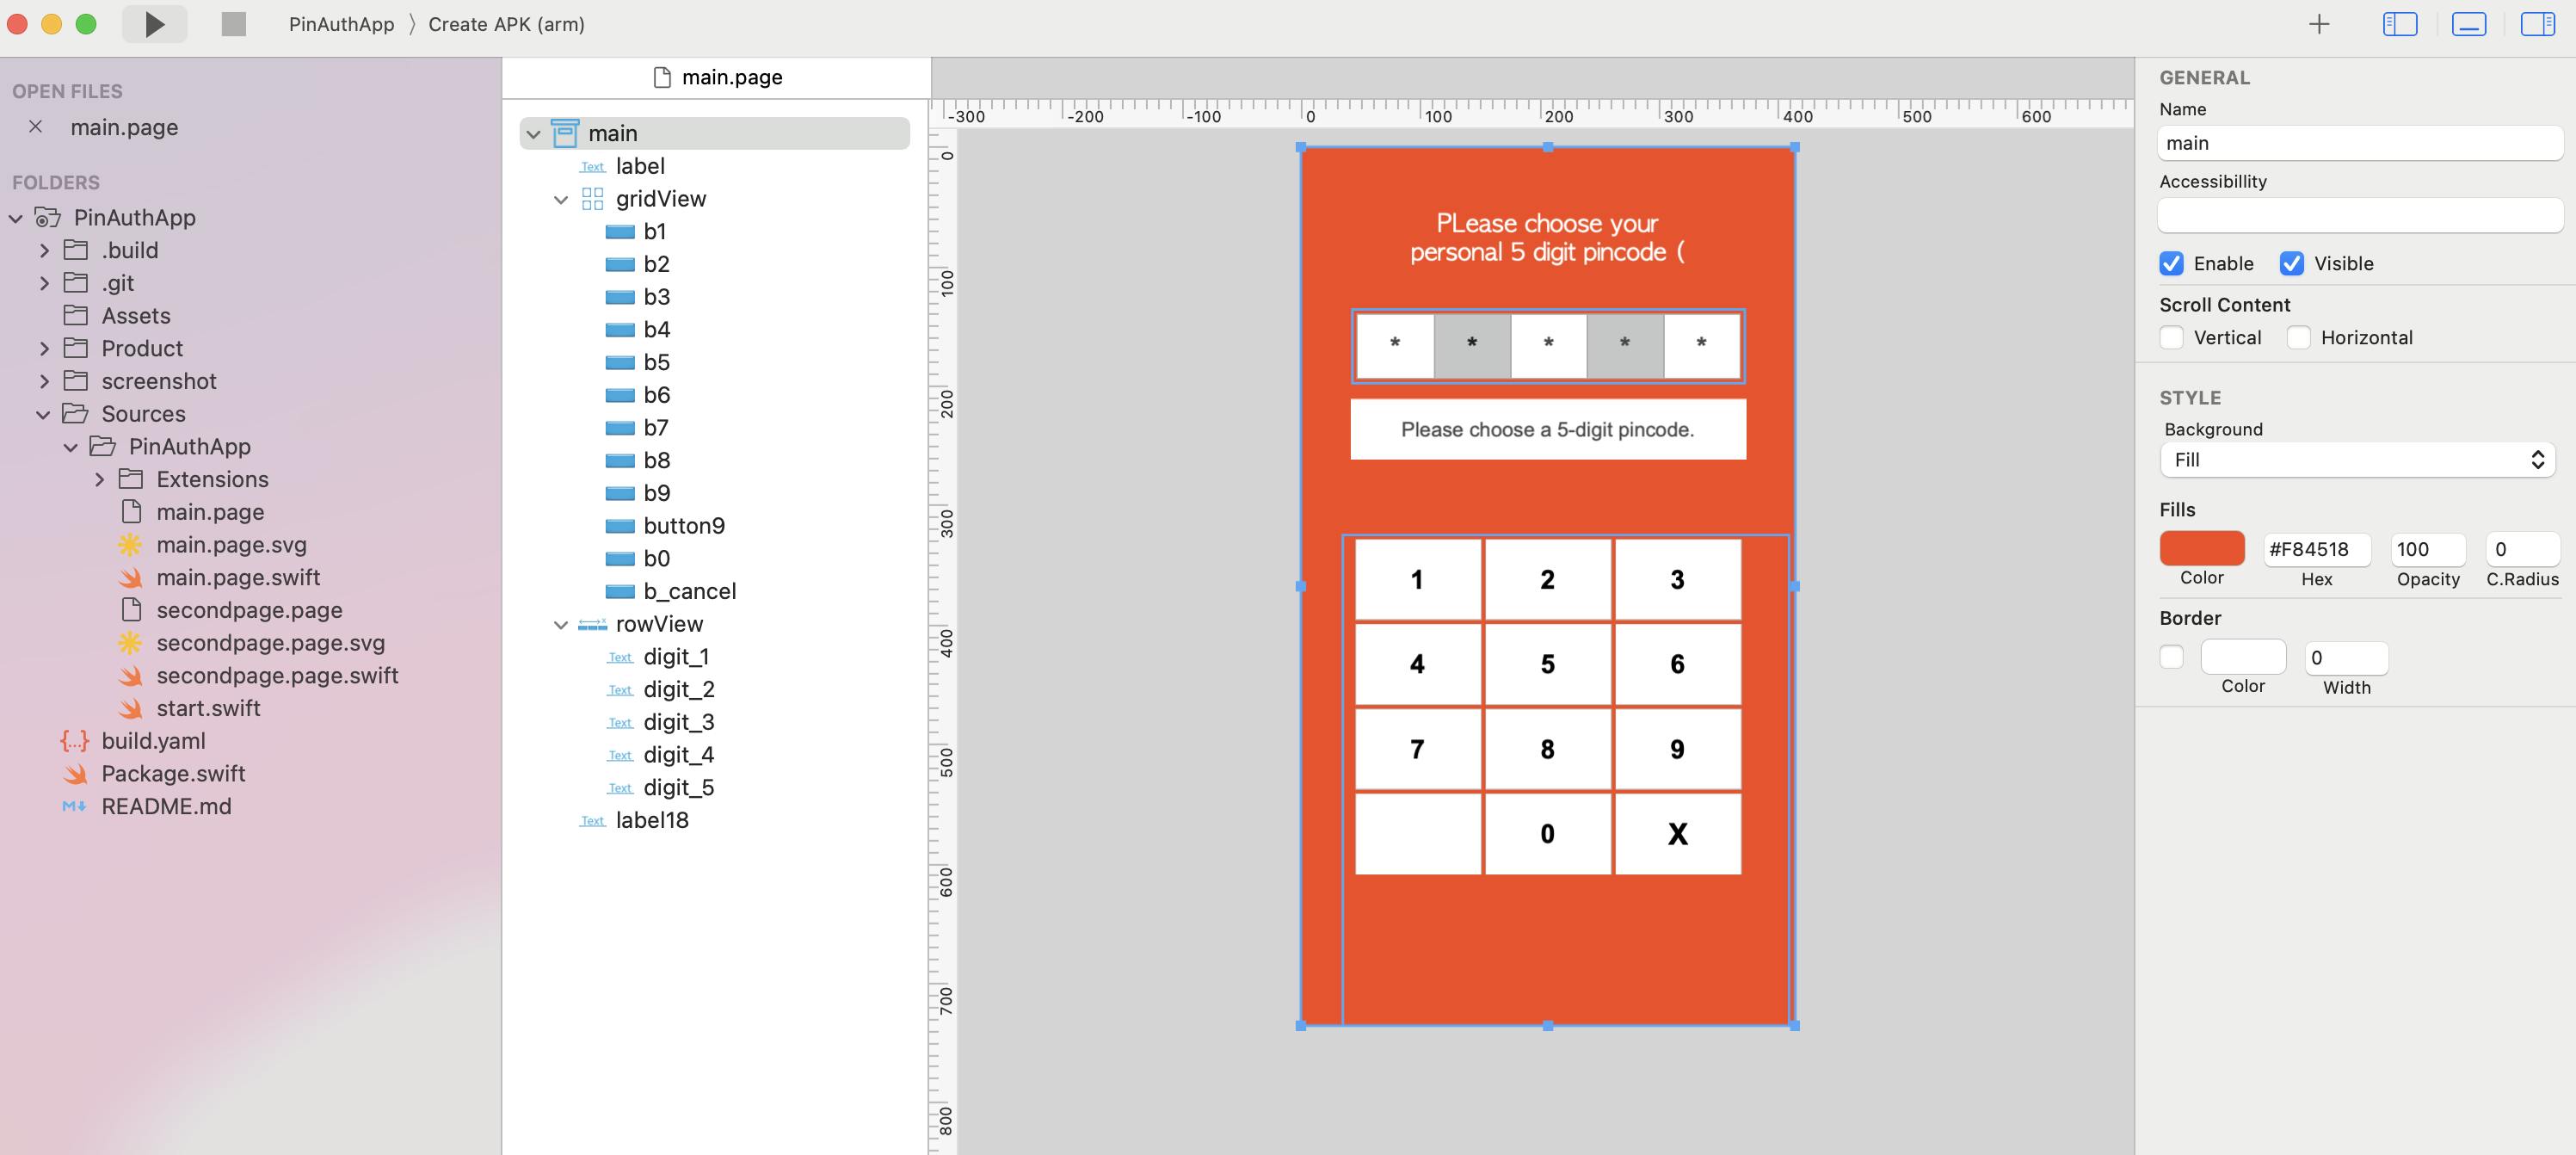
Let’s start by creating the Pin Code entry panel user interface. It will require a few buttons for the digits 0-9 and a few labels to display the entered digits.

Please choose the desired font family, size & color from the design palette for the labels.
- Label 1: We will add the app heading and assign the text (“Please choose your personal 5-digit pincode”)
- RowView: A RowView is required to hold the 5 labels, which will actually display the entered 5 digits by the user. It will contain 5 labels, equidistant from each other.
- Label 2: Let’s add another label with text(“Please choose a 5-digit pin code”).
- GridView: Add a GridView widget that will contain the panel of digits. There will be 3 columns and 4 rows. We will add the buttons from 0-9 and a backspace button as well as equidistant from each other as shown in the above image.
Let’s dive into the Code
We have developed the UI for the application. Let’s now write the logic to fetch the entered pin digits by the user.
We will initialize a variable position to 0 to get the position of the digit entered by the user. Then accordingly, we will store the input digit to the corresponding labels as per the value of the position. If the value of the position exceeds 5, we will initialize all digit labels to zero. The logic of the same is implemented in the below code snippet.
 var position = 0
 func updatePin(val: Int) {
   if val == -1 {
     if position == 1 {
       self.digit_1.text = "*"
       position -= 1
     } else if position == 2 {
       self.digit_2.text = "*"
       position -= 1
     } else if position == 3 {
       self.digit_3.text = "*"
       position -= 1
     } else if position == 4 {
       self.digit_4.text = "*"
       position -= 1
     } else if position == 5 {
       self.digit_5.text = "*"
       position -= 1
     }
   } else {
     position += 1
     if position == 1 {
       self.digit_1.text = String(val)

     } else if position == 2 {
       self.digit_2.text = String(val)

     } else if position == 3 {
       self.digit_3.text = String(val)

     } else if position == 4 {
       self.digit_4.text = String(val)

     } else if position == 5 {
       self.digit_5.text = String(val)
       pinString =
         "\(self.digit_1.text)\(self.digit_2.text)\(self.digit_3.text)\(self.digit_4.text)\(self.digit_5.text)"
       self.callFinalMethod(pin: pinString)
     } else {
       position = 5
       print("Exceeded")
     }
   }
 }
Let’s implement the touch gesture
Let’s implement the touch effect to buttons whenever they are pressed. For this, let us first define the colors which will be visible upon clicking the buttons.
  // colors
  let colorDefaultGreen = SCDGraphicsRGB(red: 211, green: 211, blue: 211, alpha: 255)
  let whiteColor = SCDGraphicsRGB(red: 255, green: 255, blue: 255, alpha: 255)
As the next step, we will now use SCDSvgPanGestureRecognizer instance which will override the method onPanAction(), which provides the interface to implement the gesture handler logic.
 func getUpDownGestureForButton(btn: SCDWidgetsButton, val: Int) -> SCDSvgPanGestureRecognizer {

   // Create action*
   func onPanAction(recognizer: SCDSvgGestureRecognizer?) {

     // depending on whether we are inside or outside of the button,
     // we set the button background a different color
     switch recognizer!.state {
     case .began:
       btn.backgroundColor = self.colorDefaultGreen
       self.updatePin(val: val)
     case .ended:
       btn.backgroundColor = self.whiteColor
     default:
       return
     }
   }

   // create recognizer
   let panGestureRecognizer = SCDSvgPanGestureRecognizer(onPanAction)

   // Configure gesture --> nothing to configure. Return it
   return panGestureRecognizer

 }
SCDSvgGestureRecognizer instance returns the state of the event, for example, it returns two states began and ended. We can implement the logic to add the touch effect here by changing the background colors of the buttons as soon as it changes the state from began to ended.
Finally, let’s append the above method getUpDownGestureForButton to each of the buttons.
// add gesture to button. It changes the background color
// of the button when button is pressed (began) and finger is lifted // up (ended)
    self.b0.drawing!.gestureRecognizers.append(getUpDownGestureForButton(btn: self.b0, val: 0))
    self.b1.drawing!.gestureRecognizers.append(getUpDownGestureForButton(btn: self.b1, val: 1))
    self.b2.drawing!.gestureRecognizers.append(getUpDownGestureForButton(btn: self.b2, val: 2))
    self.b3.drawing!.gestureRecognizers.append(getUpDownGestureForButton(btn: self.b3, val: 3))
    self.b4.drawing!.gestureRecognizers.append(getUpDownGestureForButton(btn: self.b4, val: 4))
    self.b5.drawing!.gestureRecognizers.append(getUpDownGestureForButton(btn: self.b5, val: 5))
    self.b6.drawing!.gestureRecognizers.append(getUpDownGestureForButton(btn: self.b6, val: 6))
    self.b7.drawing!.gestureRecognizers.append(getUpDownGestureForButton(btn: self.b7, val: 7))
    self.b8.drawing!.gestureRecognizers.append(getUpDownGestureForButton(btn: self.b8, val: 8))
    self.b9.drawing!.gestureRecognizers.append(getUpDownGestureForButton(btn: self.b9, val: 9))
    self.b_cancel.drawing!.gestureRecognizers.append(
      getUpDownGestureForButton(btn: self.b_cancel, val: -1))
The above code snippet implements the gestureRecognizers method which calls the gesture implementation method as parameter.
Run the App on iOS/Android
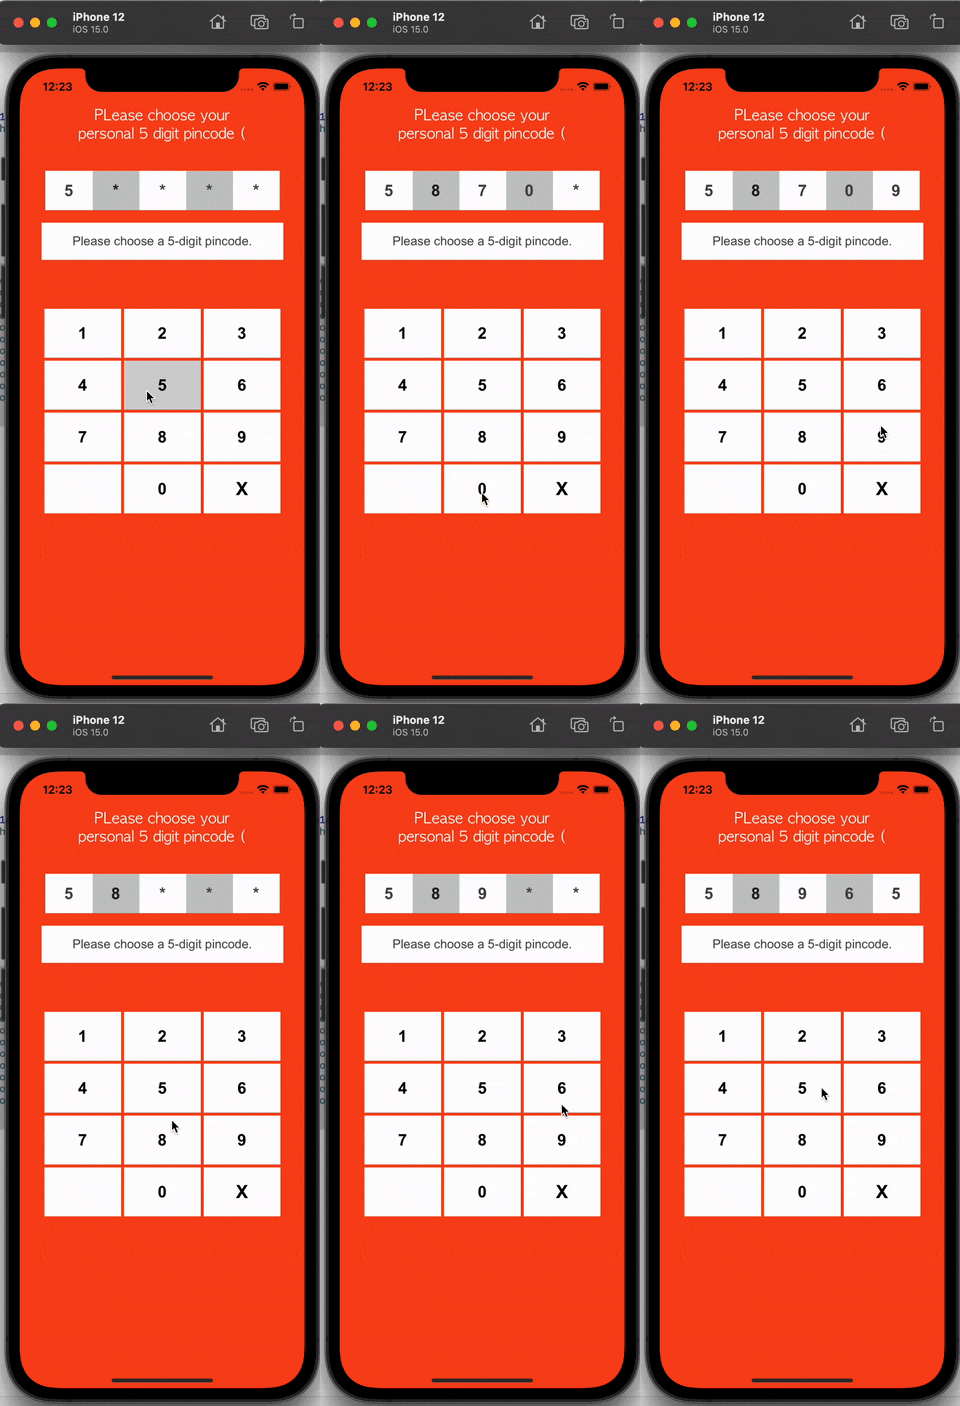
In order to run the app on iOS/Android devices, please make sure the physical devices or simulator/emulator are up and running. SCADE apps can be run on SCADE emulators, iOS & Android devices as well as Apple and Android emulators.
You can also build the app for Android (APK/AAB) or iOS (IPA) to publish them to the respective app stores. You need to click on the App Name button and choose the device target accordingly.
iOS

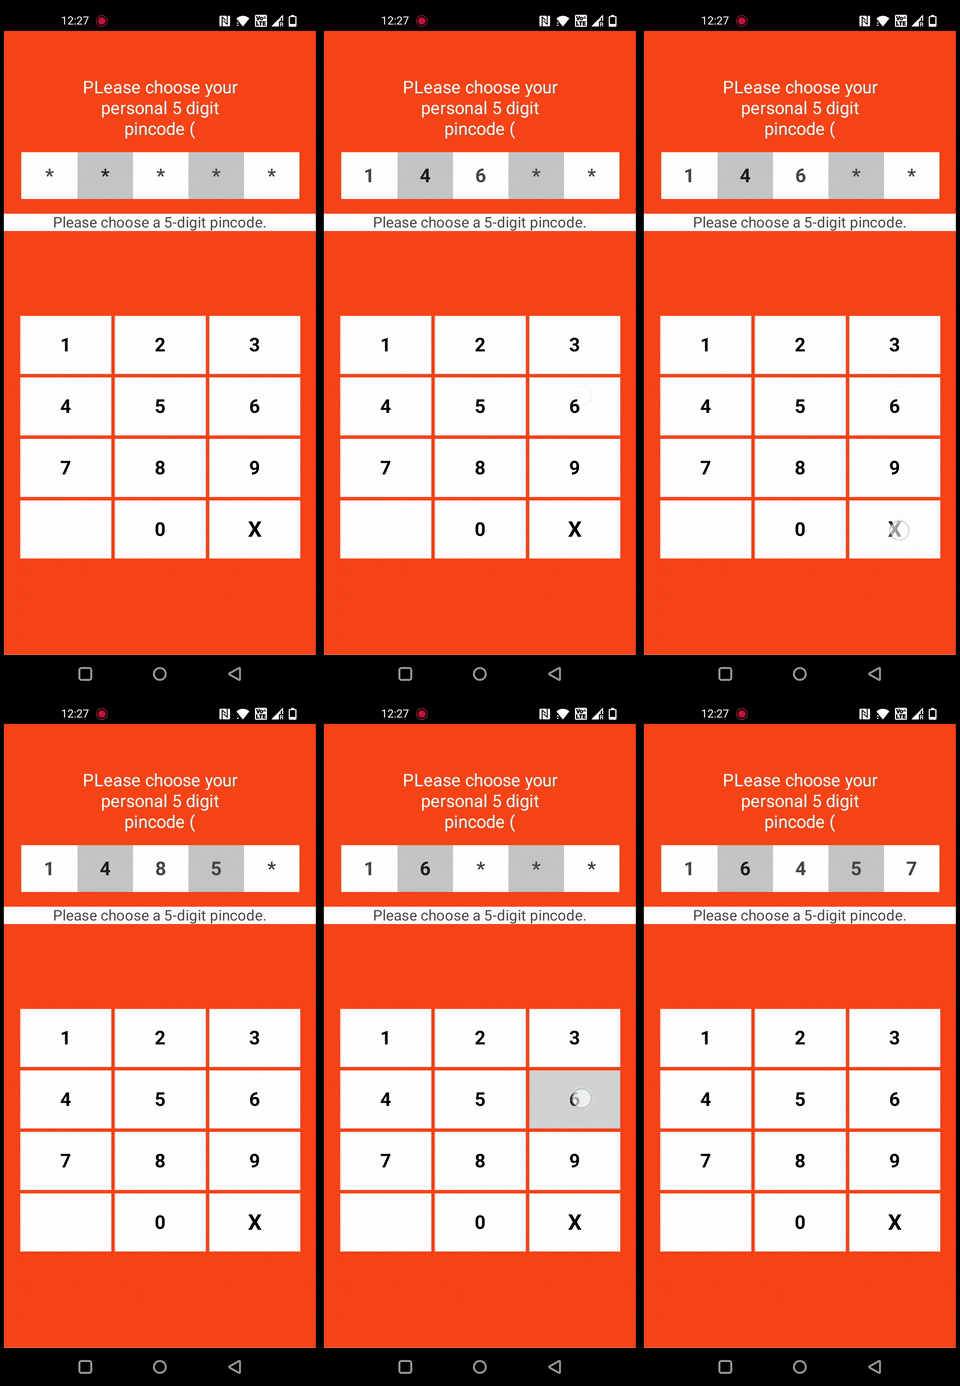
Android
Now we are good to test the code on Android devices. Set the target to any Android device you like and test if it is working as expected.

Voila🎊! We have successfully implemented the touch effect to buttons using the gesture feature available in SCADE. This is one of the examples of using a gesture-powered feature by the SCADE editor. You should definitely try the SCADE editor to build some of the cross platforms apps.
We will be releasing a series of articles related to the SCADE & swift-android compiler. Thank you for reading and see you in the next article!
Happy Coding 😊!
